Showing posts with label DIY. Show all posts

Friday, May 2, 2014

Nail Stamping Know-How: Tips from an Amateur


Now before I start I just want you all to know that I am not an expert at this. I only started nail stamping this year and I know I still have a long way to go as far as achieving perfection goes, however, I do think that I have figured out a few tips to help other beginners and especially those that are financially savvy. 

I have been into nail art for a while now. I really like having painted nails, but I especially like having artfully painted nails. I discovered nail stamping after watching videos by Elleandish on Youtube and at first I wasn't a huge fan. It's not that Janelle's nails didn't look gorgeous (really they were stunning), I just wasn't keen on the idea of "cheating". After coming across so many cute wallpaper pattern nail designs on pinterest I couldn't resist trying it out. I do think that while some people probably assume that nail stamping is easy-peasy (well it can be if you have the know-how and the right tools) I know some people can be a bit too intimidated to try. Those who have tried and had difficulties may be discouraged to have another go. So as you can see my objective here is to show you how nail stamping can be accomplished and it can be affordable.

If you follow me on Facebook you may already know that I attempted to do step by step pictures for you and totally failed. I have however seen plenty of posts on the blogosphere illustrating how to do that. So I thought I would include a brief list of instructions, some links to other peoples posts that may be helpful, And, by sharing some insight/tips of my own.

Also, quick note: Moyou and Konad are nail stamping brands that sell plates, stampers and special polishes.

BRIEF INSTRUCTIONS:
  1.  Start with clean nails that are filed smooth. Best if nails are med-long.
  2. Paint a base colour/s. You may use any type of polish you like so long as it is not too bumpy to stamp over.
  3. Select an Image plate and the specific design you want to use.
  4. Apply a bit of your stamping polish to the nail plate.
  5. Hold your scraper at a 45 DEGREE ANGLE to the plate and slide it along to remove the excess polish from chosen design.
  6. Push the stamper down on to the design.
  7. Push the stamper down on to the nail to transfer the design.
  8. Once dry apply a topcoat.
HELPFUL LINKS:
Some of these are tips I have picked up from other bloggers (sorry if I haven't referenced you I don't quite remember who I got some of them from and some of them are sort of general tips mentioned on a lot of different places, so I'm not sure there would be a point in giving credit), and some of these tips are things I have figured out my self in this learn-as-you-go process called nail stamping.

Start with the Base Colour:

^Here are some China Glaze colours I own. I tried these ones out as stamping nail polishes but they weren't really pigmented enough to show up on my nails. They are great base colours though and apply very smoothly. 

  • You don't need to spend a lot of money on a base colour. Any colour should be fine unless the polish is textured (aka, has chunky glitters or is a crackle type effect). 
  • If you decide to use a thick glitter or shimmer polish as a base colour do consider a simple stamping design with thicker lines so that it doesn't get too busy looking.
  • If your nails are uneven and brittle use a base coat under your base colour.
  • Don't go  in blind! Figure out what colour combo and design you want before you start so you don't wreck all your hard work rummaging around for a stamping colour or image plate. 
  • I recommend using a matte/creme base colour with a metallic stamping polish and vise versa. This not only means that you have the contrast between colours, but between the textures as well.
Stamping Polish

^Here are the four stamping polishes I currently use. From left to right: Liquid Leather by China Glaze, Sonic Bloom by Sally Hansen (Insta-Dri), Platinum Silver by China Glaze and Speedy Sunburst by Sally Hansen (Insta-dri).

  • You can by Special Stamping Polishes off of Ebay, Konad and Moyou Stores.
  • You don't need to buy brand polishes, but you can't just use any polish(or the design won't show up on your nail)
  • Use the link I shared in the links heading on this post to see what polishes Sasse says works. 
  • If you are unsure google the name of the polish and "Nail Stamping" to see if the polish can be used to stamp. 
  • Take note of what other people are using so you know what to buy. 
  • When stamping make sure you take as little time as possible between applying the stamping polish to the image plate and getting it to the nail as some stamping polishes (or substitutes) can be quick drying.
Top Coat:

^Here is a collection of Base and Top Coats. I would generally just use the Sally Hansen ones for nail stamping, but if I were to use a shimmery or glittery top coat over the top I would then use a Revlon quick dry top coat to ensure that it dries.

  • To avoid smearing the stamped image make sure it is dry before you apply top coat. 
  • Apply it in big drops touching the polish as lightly as possible to avoid running colours into each other. 
  • Google recommended top coats for use with Konad or Moyou.
  • You can use a really fine glitter top coat or put a swirl of glitter outside of the stamped image, but be careful about using chunky glitters over stamped images as it may cover too much of your design.
Image Plates:

^Here is the 'HP' Plate by Vanity Nails

^This is the 'Cartoon Heaven' Image Plate from Vanity Nails

^Here is a small Hexagon Nail Plate I purchased from Nail Art Fairy on Etsy.

^I haven't opened this plate yet. As you can see it's still got the blue stuff on it. It's from Nail Art Fairy.

  • Nail plates can be purchased from Moyou, Konad, Ebay and Etsy. 
  • If you are unsure about the quality of a plate you want to buy google reviews on it.
  • The cheap circle plates I first tried had very fine designs that wouldn't transfer. Use image plates that are etched deep so you can ensure the image will transfer.
  • Some of the designs on the cheaper plates are awkward sizes, so be aware that you may not be able to use all of the images on your nails.
  • When buying individual image plate designs you want the design to be small enough to fit on your nail without important parts being cut off.
  • When buying patterned image plate designs you want the design to be bigger than your nail so you will get all of the nail covered.
  • You can also compare the image size of different brands here
Stamper and Scraper:

^This is the stamper and scraper combo I use. I bought this off of eBay.

  • Plastic scrapers are less likely to leave scratches on your plates than a metal one will.
  • The squishier the stamper, the better. If a stamper is really squishy it won't require as much force to transfer the image.
  • Don't buy the cheap purple stamping kit from Target. I bought the same one even cheaper off eBay and I don't recommend it.
  • When stamping large designs use a slight tilting/rolling motion to ensure all of the design is transferred. Remember nails are slightly curved.
Extras:
^Here is my nail dryer (battery operated) and nail art pen

  • Nail dryer or a hair dryer can help to dry nails between coats.
  • Nail art pens or lacquers in the same colour as your stamping polish can be helpful for fixing up smudges or missed sections of your design.
  • Use scrap paper to test out your stamper and to protect your furniture or floor from nail polish.

Cleaning Up:

^Here is a pic of some of the nail polish removers I use. They are both cheap, but they both work well.

  • Keep an express nail polish remover on hand so that you can remove a smudged nail without stuffing up the rest of them. 
  • Make sure you clean off nail plates after use. I hate doing this as the nail polish remover wipes usually take off the polish on my hand so I like to ask a family member (like my dad) to pretty please clean the nail plate.
  • Most nail stuff should be cleaned with nail polish remover and then dried. Water tends to make it go sticky and gross. 
HERE ARE SOME OF THE NAIL DESIGNS I HAVE DONE:
^Nostalgic Nail Lacquer in Karma Chameleon with A HP by Vanity Nails stamped statement nail.

^Just a cheap Minnie mouse plate from Nail Art Fairy on Etsy.
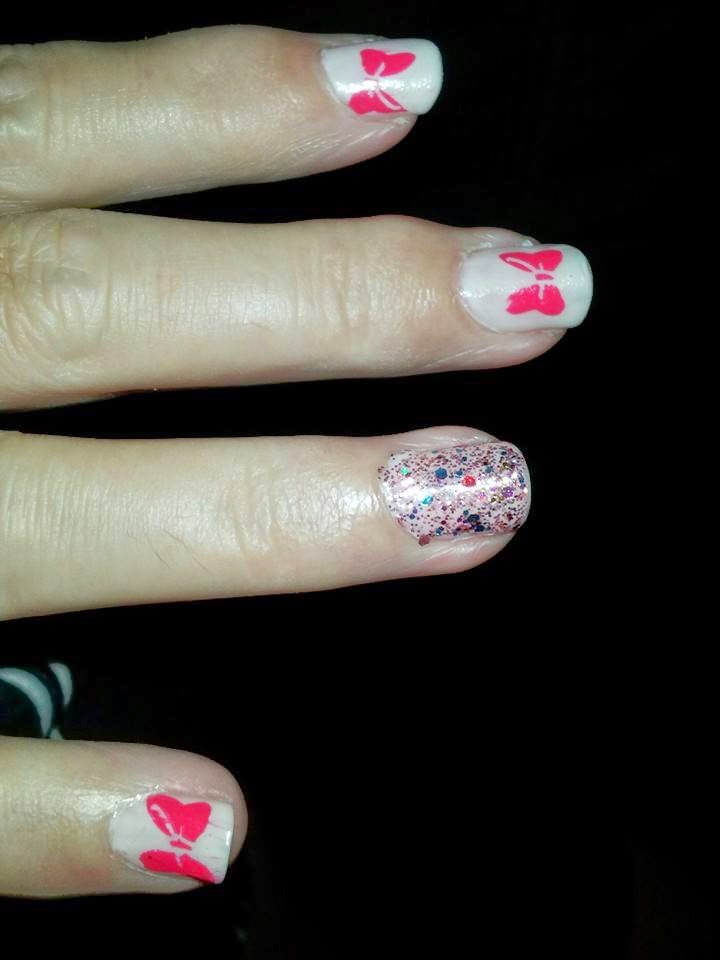

^Another cheap nail stamp used in this one.

^Not sure if you can see. Stamped silver onto purple. A combination of cheap nail images and ones from the Vanity Nails Cartoon Haven Plate.

WHERE TO BUY:
MAIN POINTS TO REMEMBER:
  • Scrape Excess at 45 DEGREE ANGLE
  • Google is your best friend. Use google to find out what polishes, plates and stamping sets work.
  • Try not to take too long to transfer your image or the polish will dry.
  • Be careful applying top coat so you don't smudge your design.
  • Don't use water to clean image plates. A nail polish remover wipe and a tissue are recommended.
I hope this was a helpful post. I only listed links to where to buy stuff that I have used as I do not want to link you to things that aren't any good. I hope all of the pictures, tips and links were helpful and if you want to know any more please comment with your questions so I can help. Like I said earlier I am not a professional. 

Your Favourite Blogger,
Natalie

Saturday, November 9, 2013

5 DIY Projects That I Have Been Planning Forever


It's not very often that I finish a DIY project or that I am happy with the end result. I certainly like to indulge in DIY inspiration and spend time going through the process of beginning a project, but most of the time it just doesn't really happen. I would like to think that at some point these projects will happen and I suppose that it's highly likely that they will happen, just later than originally anticipated. After all, Christmas will be coming up soon and it's at Christmas that I always seem to get the Craft Bug.

I'm always interested to read about the craft projects that people undertake on their blogs and I never really have anything to share with these accomplished people; seeing as my list of achievements in the DIY department are insignificant. And, while I know it will take me a long time to do the projects I dream of, I do get excited about them and I do want to share them with people. So here it goes, 5 projects I have been planning forever:

1. CROCHETED SQUARE BLANKET
I learned to crochet in grade 6. I haven't really advanced much since then, but I still find it to be fun. I also started making a square blanket then and I have around 60 or so squares sitting in a bag in the top of my old cupboard. By the time I had made what seemed like enough squares I realised that I had grown and that the blanket wouldn't be big enough. The blanket is supposed to be an Ice cream rug because it consists of Nepolitan colours. I have had difficulty matching up the same shade of brown for later squares so there's an awful lot of pink. 

2. ALTERING CLOTHES & REVAMPING OLD CLOTHES
I have a bad habit of taking in unwanted clothes (or buying second hand clothes) that are in bad need of an alteration. I have one particular dress that I inherited from an old work-mate that desperately needs to be hemmed, but I keep putting it off. Poor dress will just have to wait a little longer... I also have a bit of a collection of Men's shirts that I have been planning to make into skirts. My last attempt was a bit of a fail and it ended up being a top, but I still haven't figured out what I am doing with the straps... I 

3. CROCHETED CAPES, COLLARS and BERETS
I have also attempted to make a few berets and crochet collars over the years. I am not overly impressed with how the collars turned out, but the berets do look sweet. I have seen a lot  of cute lacy vintage style patterns for crochet hats, capes and scarves, but I'm not so sure about trying them out. While I do understand abbreviations I'm not so sure about the repeating, increasing, decreasing or where-the-stitch-is-actually-supposed-to-go parts of the pattern and I prefer to just make stuff up, instead of following the pattern. There are also some really cute crochet flowers books out there -it seems like they have endless possibilities- but, that means more patterns...

4. VINTAGE STYLE HATS AND HEAD PIECES
Earlier this year I acquired a book about the art of hat making. It's mainly meant for fascinators and felt hats for race day, but there were a few old fashioned 20's style head pieces and this cute flowered hat that had to be pinned into the wearer's hair. It got me inspired, but I would need to buy the materials online and I haven't gotten around to that part yet.

5. DIY STOCKINGS
I have seen a few different DIY projects involving stockings and I thought it would be fun to try them. I did actually try one, but it was a tad lame and the stockings are ruined so I'm not so keen on more attempts.

Do you have any DIY projects in the works?

Your Favourite Blogger,
Natalie

Monday, August 5, 2013

She Wore a Raspberry Beret

Hi guys,
I don't know if any of you guys crochet or not (and if so how many of you there are), but I know that many of you were impressed with my beret and thought that regardless of whether or not you already new how to crochet a beret is definitely a fairly simple task to try. So if you're interested, you can read about how to make your own, and what other crochet projects I have in the works.

I learnt to crochet in grade 6 (the year I turned eleven) and made my little cousin a baby blanket and a baby beanie (though it didn't fit his head - I had underestimated how big a baby's head actually was) and my other cousin used it as a hat for her doll. I have since crocheted more than 60 squares to make a blanket (every time I think I'm finished I realise that I am bigger than I used to be and need a bigger blanket), crocheted some doilies, crocheted some towel toppers and made three berets. I never make anything that is too difficult or with patterns spanning for whole A4 pages. I have a few crochet books, but I have barely tried anything in those.

In the picture above I have shown off two of the berets I have created. There is a black one and a blue/grey. The colours in this photo look a bit odd and it didn't matter what I did with the settings I just couldn't get it to work. I've showed the beret from a top view and a side view. The purple looking ball of wool is actually more maroon looking in real life. I am planning to make a raspberry beret with this colour (yes like a prince song). And, the wool underneath is the wool I used to make a beret for my sister which I don't have a picture of. The wool is actually a mauve/purple mix, not grey like it looks. There are also some polka dot scissors and two different sized crochet hooks.

I used this Free Beret Pattern to guide me, though I didn't entirely restrict myself to it. I found that it was easier to make certain changes to the pattern to avoid certain effects to the overall look of the beret. So each beret has changed slightly in design, my favourite being the last one I made. The first one was more gathered at one side and the second one came to point at the band rather than going straight all the way around. 

I ended up using a hook that was .5mm bigger than suggested as I have a bad habit of doing tight stitches. I also ignored any parts of the pattern that were different at the joining section (for example if it said  "double crochet in nxt 7 dcs *2chain, double crochet in next space* repeat from * around to *" I would do "double crochet in next space 2 chain *repeat till end of round). I also made sure that all of the joins at the end of each round were indeed round (and didn't come to a point) this meant that I would miss stitches or add stitches if needed. I also changed the decreases by half to prevent the puckering effect. And, I included one extra round in there somewhere.

It is also important that you don't freak out when it turns out small an bunchy. An iron on the wool setting will help to stretch it out and make the stitches look neater. Ironing can be the difference between a beret that fits and a doll's hat. Also be sure to learn where your pattern came from and what stitches you should be using. A single crochet is the equivalent of an Aus double crochet and a double crochet is the equivalent of an Aus treble.

Which colour do you think I should make? I have been wanting to make my wine coloured beret (I guess it's not really raspberry but it makes me feel cool to reference a prince song) for a while and had a bit of difficulty understanding the crochet pattern at first. I do really like the black so far though. It's very timeless.

I've got a few towel toppers to finish and that blanket I've been crocheting for ages, but I'm also considering some art deco style hats and a vintage style cape. I have attempted crochet collars before but I'm not to sure about those.

Your Favourite Blogger,
Natalie

Saturday, November 3, 2012

Non-fiction Review: Minxy Vintage by Kelly Doust

Minxy Vintage: How to Customise and Wear Vintage Clothing
THE DETAILS:
Pages: 255
Genre: Non-fiction, Fashion/DIY
Release Date: October 2011
Publisher: Murdoch books
I bought it online.

THE BLURB:
Do you browse through vintage or retro clothes at flea markets and wish you had the knack to breathe new life into the dated frocks, skirts and smocks?

Kelly Doust’s Minxy Vintage will help you transform these items – and indeed any item in your wardrobe, ripe for reinvention. In Minxy Vintage, Kelly combines her love of fashion with creativity, transforming more than 50 damaged, ill-fitting and past-it clothes into modern, wearable pieces.

 This is not just a book about loving vintage fashion: it’s about seeing the wonderful possibilities for updating all old clothes, and how to look fabulous doing so, no matter what your age, location or budget.

THE REVIEW:
I absolutely adored Doust's other book 'A Life in Frocks' which is a memoir about her life (so far) and the clothes she wore during it. While I found 'Minxy Vintage' to be charming (like a cup of tea and a chat with an old friend), I was a little disappointed as far as the "How to" aspect of this book was concerned.

'Minxy Vintage' has a description and tag line promising the reader a guide to vintage fashion, alteration and restoration. The book is filled with pictures and stories behind many items/outfits, the author Kelly Doust has bought and customised. I like that she included items that she has bought and fixed up herself, rather than vague "How to" instructions  like I sometimes include on here. With pictures, it's proof that she has actually done this.

So she includes pictures and a full page of writing about where she got it and how she likes to wear it, And, how she customised it, but this is where there is a lack of "How to". There is no real tutorial here. There is a list of what she did, which is slightly helpful, definitely inspirational, but lacks real detailed explanation. For a skilled seamstress, this book could be quite helpful, but to the beginner, could be difficult to follow. There are lots of words that people who haven't done much sewing before wouldn't understand, and if they did, they might not understand how to actually create that effect.

I really liked the things she came up with and seeing the clothes transform. The book (whether it's actually helpful or not) is worth it for the inspiration factor. It's visually pleasing and the layout of the book itself is quite charming. The descriptions of the outfits she imagines or the things she looks for are also very luxe. Some of the outfits, were probably a more suited for a costume party than anything else, but were visually pleasing nonetheless.

I think the most helpful thing in this book was the guide to finding vintage items that are worth buying. How to tell the treasure from the trash and how to identify the era or place the item may have originated from. This is something that I have trouble with when shopping for second-hand clothing sometimes and a task that a lot of people I know find almost impossible.

Overall, I think this book is worth 4/5 stars. It's brimming with ideas and prettiness. I think the main problem I have with the book is the lack of explanation and pictures when it comes to the customisation of the garment. I did enjoy it though, And will certainly be checking out some more books by Kelly Doust in the future.


Your Favourite Blogger,
Natalie

Monday, October 15, 2012

DIY Tube Scarf

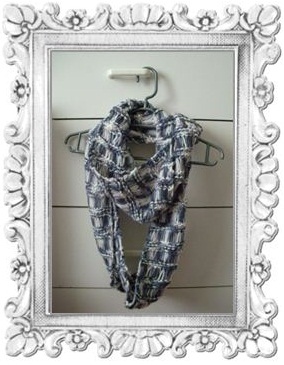
I've noticed that there is a lot of winter stuff coming onto the online stores based in the USA. "That's right it's autumn over there at the moment isn't it?" says the forgetful old-lady voice in my head (she also has a brittish accent). Actually, I think the UK and Asia are in for a white Christmas too... Forgive me if I'm wrong, but I'm not entirely sure about how the seasons thing works for different countries.  Anyway, it got me thinking. I was seeing all these lovely chunky scarves and tube scarves and I remembered that I hadn't finished mine. I thought I'd make mine into a tube scarf, because I really couldn't be bothered knitting much longer, And, I thought I'd write a tutorial about it.
 
So if it's autumn in your country this is definitely a good project to have some fun with before it gets too cold. If you are currently residing in a warmer climate (like me) here's a project to pen into your calendar for next autumn. Or, if you are a slow crafter like me, you can start now.
 
STEP 1:
Find a knit or crochet pattern that you like. I used the Loose Knit Scarf Pattern (an old favourite), but you can use any pattern you wish.
 
STEP 2:
Knit or crochet the pattern until the scarf is the length you need. You will need to check the scarf as you go (buy wrapping the scarf around your neck to see if it is long enough to be joined) which can be awkward when the knitting needle is joined onto the end (not much you can do about that sorry). you want to hold both the ends together when you do this (like you would if you were actually sewing them.
 
Things to remember before you decide that the scarf is long enough:
-The scarf not only has to fit around your neck, but it has to be big enough to slide over your head.
-how do you want to wear the scarf? If you want to just pull it over your head it won't have to be very long, but if you want to be able to wrap it around a second time (like mine) you'll need a fair bit more fabric
-You'll have to finish the end of a series of stitches if it is a repetitive pattern and you want the join to be less noticeable
-The scarf will become longer (and wider) once ironed.
 
When folded in half, my scarf (which hadn't her been ironed) measured approximately 33 inches / 82 centimetres in length.
 
STEP 3:
Once you've reached the desired length cast off (or tie a knot) depending on how you are making the scarf.  Then, iron it.
 
STEP 4:
Fold the scarf so that the two ends are sitting at the half way point and sew them together as if they are continuing (diagram below). Sorry about the dodgy drawing (made it on paint). I would have taken pictures of the real thing, but due to the mottled yarn and the lighting in the house I just don't think it would have made much sense.


 STEP 5:
You can tuck the ends in using a crochet hook, but if you're like me and aren't very good at that sort of thing, try tying a very tight knot and snipping the thread of very close to it. I then used clear nail polish to protect the knot from coming undone or the end from fraying.
 
STEP 6:
Wear it!
 
These scarves are very easy to wear. Like a loose necklace you can throw it over your head and twist it around once more. They can also save you the cost of extra yarn, because you don't need so much to make it.
 
ANOTHER IDEA:
 
Which I saw here. I prefer mine without fringing, but it's up to the individual.
 
If you can't knit or crochet, but have an old shirt that you don't wear anymore, you can cut the bottom off the old shirt and wear it as a scarf. You won't even have to sew (unless the shirt isn't made out of jersey-type fabric, which means you'll have to hem it bottom and top). Unfortunately you won't get a choice in length with this one.
 
Hope you enjoyed the tute!
 
Your Favourite Blogger,
Natalie

Friday, August 10, 2012

DIY Tutorial: Loose fitting shirt


I did a post not too long ago called 'Comfort Meets Class' where I talked  about my version of comfy and how you don't have to "dress down" to be comfortable. One of the DIY ideas I included was to create a loose fitting shirt. So today that's what I decided to do. I'm not great at sewing, but I'm hoping I've managed to get my idea across.

THE MATERIAL:
The "Material" I decided to use to make this shirt was a second hand men's shirt. I bought three shirts at the op-shop the other day all intended for DIY projects. Two of these shirts cost me $6 and one of them cost me $4. I'm hoping to get at least one garment out of each shirt. We don't have a good material shop in our town and even if we did I'd probably still prefer to buy second hand because it's much cheaper.

 What I like about them is that they are made out of a nice thin, soft material and have cool patterns on them. I decided to go with men's shirts rather than women's because the fabric  tended to be softer and the shirts were larger which gave me more room to work with. Women's shirts also tended to cost more than the men's shirts and have darts sewn into them (which didn't work well for the style shirt I want to make). I liked that the shirts were button-up shirts, but this style can be done without buttons too.


^ These are the three shirts I bought on my op-shop trip. I chose to use the one on the left for this project. I was a little disappointed that I couldn't find any plain/plainer looking shirts to cut up for this project, because I thought that would suit the style of shirt I want to make.

THE IDEA:
I got the Idea to make a loose-fitting shirt simply because I have a few of them and I wear them a lot. This is legitimate. The shirt goes into the wash and as soon as it's clean again I'm wearing it. I thought they looked easy enough to make and that seeing as they were a loose fitting style, it wouldn't matter if I made it slightly bigger or smaller than the original.

According to one of the price tags from a shirt I have of this style, these shirts are called 'Boyfriend' shirts. I guess this makes sense because like boyfriend jeans the shirt is a bit baggy and isn't really designed to show off your curves. I have four different variations of the 'Boyfriend shirt' and decided to copy the one that I like best.


^ This is the shirt I decided to copy. It's made of three pieces and it's only fault is that it's a tincy bit short (probably something to do with how tall I am). I got this shirt from my sister who got it free with a magazine. It's one of those one-size-fits-all clothing items, but my sister didn't want it so I adopted it.

WHAT YOU NEED:
-Material of some sort (Preferably with a big enough surface area to cut out one whole piece of your pattern)
-A boyfriend shirt to use as a pattern (you could also use an over sized t shirt or a cropped top)
-Sewing supplies (pins, sewing machine, quick unpick, dressmaking scissors...)

INSTRUCTIONS:
1. Remove things that you can use later or that won't suit your chosen shirt style. For example if you like detachable collars and want to make your own (and if your shirt has stitching up near the collar) you can cut the collar off and save it. I decided to get rid of the pocket because it would have been in an awkward spot when the garment was finished.
^I didn't have a quick unpick so I used a 1.25mm crochet hook (yep I crochet) and a pair of teeny tiny embroidery scissors (you can use nail scissors if you like) to unpick the stitches.

2. Lay the shirt down flat and place your garment on top of it and start cutting out your pattern pieces.
^ I chose to put my shirt upside-down because ladies buttons do-up on the other side to men's ones and because the holes from unpicking the pocket would be less noticeable down the bottom of the shirt.

^I folded bits of the boyfriend shirt underneath so that I would only cut the material to get the pattern piece I needed. I was careful to only cut the top layer of fabric (the shirt was buttoned up) and to leave an inch or so around the grey shirt for seams. I cut the pattern piece a bit longer than the grey shirt on purpose.

^ This is the back piece of the pattern.

^ This is when I was cutting out the thick shoulder bias strips.

3. Lay out the pattern pieces in order and start pinning them together for sewing.
^ The piece on the left is the back, the two pieces in the middle are the bias strips and the piece on the right is the front. In this picture the two bias pieces are actually the wrong way around. Luckily I figured that out before I started pinning and sewing.

^ This is my shirt all pinned up and ready to go. Remember to pin your garment inside-out.

4. Check that you've done it right before you go and stitch it up permanently.
^ For example check that the arm holes are big enough. Remember if you're using a shirt made out of a stretch fabric as your pattern you will have to make allowances for the lack of resilience in other fabrics when cutting and pinning your pattern.

4. Sew. If you've had experience with sewing you'll probably be able to guess what to do next.
I used a straight stitch to stitch the side seams and shoulder seams. After checking that they were correct I used a fine zigzag stitch to stop fraying (don't have an over-locker).
I then doubled over the ends of the sleeves, the neckline and the bottom of the shirt before pinning and sewing (If you have an overlocker you could just overlock and fold under once.

I had issues with the sewing machine toward the end, because the machine doesn't work well with certain types of cotton, I don't have an over-locker, I don't have heaps of sewing experience and I didn't have the needle set up right. So the shirt does look a little bit dodgier than I had hoped. Considering how much went wrong with the shirt towards the end I think it turned out okay.

^ The finished product. I think It will look nice with denim and faux pearls.

Your Favourite Blogger,
Natalie

Tuesday, July 31, 2012

An Idea Involving Bookmarks


I made a bookmark so that the people who read my blog can download one and print it out (only if they want to). I made a black and white one so that it can be printed on coloured paper or coloured in my a younger sibling/relative. I designed it so that it can be folded in half and glued to produce a double-sided book mark. Laminating is optional.

I would like to put an idea out there to other bloggers. I think it would be really cool if some of the blogs I followed made bookmarks that I could download and print out. If they could upload it to tumblr and tag 'An idea involving Bookmarks' it would be even better. I think this is a great way to expose other people to the world of book blogging (and blogging in general). I want to see how many people will try this and how big it can get.

If you want to go one step further; a cool idea is to leave your book mark (or someone elses) in a public place. I saw people do this with the 'Near Witch' book marks last year and thought it was a really cool concept. You could leave it on a notice board, leave it in a library book or even at your local fast food joint... You could take a picture of the place you leave it and upload it to tumblr with the 'An Idea Involving Bookmarkes' as a tag.

If you come up with any other cool ideas I'd love to hear them!

If you want to print my bookmark simply go to Here , Copy and paste it to a word document and print.

Your Favourite Blogger,
Natalie

Friday, July 27, 2012

DIY Cover Picture for Facebook Timeline

Those who follow the blog's Facebook page may have noticed a knew timeline picture (pictured above). I came up with the idea to create one using Polyvore after seeing many collage cover pictures generated by apps on personal facebook pages. I thought: "I wonder if Goodreads has an app like this?" If they did have one I still haven't found it. And then, I remembered that I used to make little pictures for my blog (still do) for segments and such, and why didn't I just make a cover picture using polyvore. Even better, why didn't I make a template so other people could use it and I could make a new one when I got sick of the one I just made?

HOW IT WORKS:
It's actually pretty simple. I created a template on Polyvore.com (via Create>Template) which I published with instructions on how I recommend the template to be used. I then filled out the template (via Create>Set) and found the template (via Templates>My Templates), filled it out, published it and used the 'Snipper Tool' (Which most modern computers have). I highlighted the area I wanted to save as an Image, saved it and then went on to facebook and uploaded a new cover image.

If you are using a template created by someone else you will need to visit a set of that template (a filled out template someone has published) and click on the miniature image of the template below the set. You will be taken to a screen with an empty image of the template and will need to click on the option to "Fill this template". I have created a collection of sets (Click Here) that I have made using different timeline templates. To access the template click on the set (the template filled out) that you most desire and follow the instructions at the beginning of this paragraph.

FILLING OUT YOUR TEMPLATE:
-The template can be filled out using images from 'My Items' or from the polyvore search engine. Select the image you want and drag it over to the placeholder you would like to put it into. Once the placeholder is highlighted orange drop the image.

-To find the item you want be sure to use the right keywords. For example if you are looking for a galaxy background image be sure to search "galaxy background", because "galaxy" will land you with a heap of really pretty star splattered skirts.

-To add items to 'My Items' so that you have them for later you can click on the image you want (In the right sidebar only; don't click on images in the template) and a few options will come up. One of them should be 'Save to my Items'. If you want to add images to Polyvore that aren't there already you can install the Polyvore Clipper which allows you to download images from your favourite Tumblrs and blogs.

-If you are having any issues with your image not looking right in the template you can:
  • Move it around within the placeholder, by clicking on the image (not letting go of the button on the mouse) and move the mouse until your image is in the desired spot.
  • Make the image smaller or larger using the slider thing (that looks kinda like a volume adjustment thingy) at the top of the page.
  • Flop or flip the image using the buttons up the top of the page
  • Take away the background of the image or add the background of the image. There are two squares next to the slider thing.
  • "Fit" the image. Which really just means that the biggest part of the image (length or width) does not exceed the placeholder.
  • Remove the image and add a new one.
THINGS TO REMEMBER WHEN MAKING A TEMPLATE:
I'm not going to explain how to make a template. If you are a polyvore wiz you'll know all about it. If not it's probably easier for you to use someone else's template. If you're still interested check out Polyvore Help center: How to create a template . It's not the best explanations, but like somethings, making templates is a bit of learn as you go/ trial and error.

-When making a template you really want to get the size right. You want a cover picture that isn't cut off by facebook, because it isn't the right size. To get this right I like to search for 'Timeline' in the search engine and use one of the facebook timeline images that comes up as a stencil for the background colour or place holder (and then I delete the initial image I used). Be sure that the image you found in the search engine is the right size. some of them can be a little bit "tall".

-Remember that your profile picture will cover up part of the bottom left hand corner.

-Remember that the images will get zoomed in when the cover picture is uploaded to facebook, so don't be afraid to make them a little bit smaller.

-You can't type text to use when filling out the template. You can only type text when you are creating it. If you want to be able to choose song lyrics or quotes you  might be lucky to find image versions through the search engine. If not, you could create image versions to upload onto Tumblr and upload them onto Polyvore using the Polyvore Clipper.

STILL CONFUSED?
Polyvore is a site used to create fashion/art/interior design layouts called 'Sets'. 'Templates' can be made so that people can fill them out to make 'Sets' instead of starting from scratch. I designed some special 'Templates' for facebook timeline. I made a cover picture by filling out the template, publishing it, using the snipper tool (you should have one in your computer) to save the set onto  my computer and uploaded it to facebook.

Here's one I made for my personal facebook page:
The Picture on the bottom left corner (The hand holding the stick, pointing at the moon) was mostly covered up by the profile picture. You can see a bigger version of this timeline on polyvore (via the link to the collection higher up in this post)

If you have found or made any new Timeline Templates (Templates, not sets) could you please leave a link in the comments so I can add it to my collection?

I've noticed a few Polyvorians that normally don't "Like" sets of trivial stuff have been liking these timeline sets I've been publishing, And, people have been liking the ones I've published to facebook. Which seems unusual. So, I'm guessing it's a decent sort of idea? We'll see...

Your Favourite Blogger,
Natalie

Wednesday, July 11, 2012

Comfort Meets Class

Comfort Meets Class


It's been kinda cold in Australia at the moment. That, and surprisingly rainy. Still not having found a job - I've been wearing my own clothes (as in not ones I allocated for specific work use) whilst doing things like laying in bed reading, sitting on the couch with my laptop, playing some air guitar in my room and painting. So I've had some kind of dilemma. I've decided that I want to dress nicely in case I have to go somewhere with my mum, but I don't want to dress too uncomfortably, because I'm most likely going to be spending the day inside, rugged up in bed, reading. And, then I thought, like the little girl in the taco ad "Why not have both?" and I think I found a way to look good and feel comfortable.

Why should we have to sacrifice comfort for the sake of a good appearance. When you think about it some of the most elegant, beautiful people in the world aren't fidgeting  with their skirt or adjusting their straps. It's all about simplicity and the smile you've got on your face. With some smart styling and a few accesories comfort is class.

Obviously, everyone's Idea of comfort differs. I like clothing items that aren't too clingy and that I don't have to fidget with. I'm a bit of a skirt person. And, I don't like anything that hugs my hips too tightly because I get sore hips and clothing that is too tight only makes it worse.

Some of these ideas came from my recent infatuation with Tumblr and some of the very beautiful, yet comfortable looking models in some of the pictures.

For those in a similar predicament (and a similar idea of comfort) here are some ideas:

OUTFIT IDEAS:
-Loose top (not tucked in) worn with gathered skirt, cardigan and stockings: Believe it or not I find stockings to be extremely comfortable and classy looking. This outfit is most like the one in the Polyvore set above.

-A Loose long sleeved shirt or knitted sweater and jeans (or leggings depending on the length of the shirt/sweater and a nice necklace

-A dress with either tights or leggings and an open long sleeve shirt or cardigan. Got this idea from an outfit that Lanie (charcter) wears in 'She's All That'. She wore a summer dress with a short sleved button up shirt worn over the top.

-Sweater (Not too long), ruffled skirt and stockings.

TIPS FOR EXTRA COMFORT:
-Make sure when buying stockings that you've bought the size closest to the biggest  measurement (weight or height). According to my mum's height she only needs a Small or Medium in stockings, but her weight suggests she needs a Large. I'm only light, but because of my height I am supposed to wear Large. Now I just purchase extra-large, because I like that the stockings feel thicker and aren't trying as hard to stretch over my legs.

-When purchasing a top or Jumper, don't be afraid to go a size bigger or go to the men's section. However, be sure that the top fits loosely stylish, rather than loosely fits like a sack.

-The More Gathered the better when it comes to choosing a skirt.

-Go for fabrics that feel nice against your skin. I've been avoiding jeans because of this.

-If you are wearing stockings around the house and don't want to wreck your floor with shoes or wreck your stockings with the floor, you could wear slippers.

TIPS FOR EXTRA CLASS:
-A nice necklace, hair accessory or pair of earrings never goes unnoticed. Don't go over the top though.

-A bit of eyeliner or lipstick never hurt anybody.

-A pair of dressy brogues or ballet flats can add class to any outfit.

-A belt or ribbon can be used to create a "waist" in a baggy shirt or dress.

FOR THE DARING:
-Thigh High Stockings/ High Socks.

-Patterned/Coloured tights

DIY IDEAS:
-A Button up high waisted skirt can be created using an old men's shirt, some spare material and some elastic. Cut off the collar and sleeves, Create a waist band and line the inside with the spare material and voila! If you have a petti-coat you could skip the lining part.

-A loose fitting shirt can be created by using another shirt as a pattern. Lay the shirt flat on the chosen fabric, trace the outline and cut out two identical sides. Sew the pieces together at the sides.

-If you've got a Smock style top with the elastic at the bottom you can cut off the elastic and sew a new hem to create a new shape.

-If your stockings are too small cut them off at the thighs to create knee length socks (They loose some of their stretch once they have been cropped) or, cut off the toes to create footless tights. Be careful which tights you do this with as the fancier fishnet or knitted ones may unravel once cut.

-A Tube scarf is a way to save on wool and time. They also look pretty snazzy. Knit or crochet the scarf until it is the length that you can put it over your head if the two ends were joined. Cast off and sew the ends together. This idea works well for patterns with some gather in them.

So what do you think? The first outfit idea is my favourite. It feels kind of like a modernised school uniform. I'm still not too sure about the painting. I'm either going to have to be really careful or I'm going to need to allicate daggier versions of this outfit for painting days (which is like, every day...)

Your Favourite Blogger,
Natalie

Monday, May 21, 2012

DIY PAPER DOLLIES!

YAY! My first attempt at a crafting tutorial!
What we have here is my version of a hand made paper doll. It's not the sort of paper doll you can change clothes on -however, you might be able to make one that does that if you are crafty enough- these are more permanent impressions of paper dolls inspired by Polyvore's interpretation of paper dolls and a book called 'Artful Paper Dolls' by Terry Taylor.

The Paper dolls on Polyvore consist of digitally cropped pictures of models, celebrities and garments that form the shape of a model. It's another way to present a concept or express yourself on polyvore and has become quite a popular method of doing so. The link (Polyvore underlined above) will send you to my Polyvore collection of paper dolls that I've made using the polyvore method.

The ones featured in Terry Taylor's book vary largely. I prefer the ones fashioned from old magazines, newspapers and brochures. In a way I'm combining the two versions to make my own sort of paper dolls. They are more modern and up market than Terry Taylor's, but more crafty than Polyvore's. I hope you enjoy my tutorial!

What you'll Need:
THE NECCESSITIES:
-Scissors
-Glue
-Magazines (Old ones. Please don't go murdering your latest Vogue or Frankie mags on my account)
-Paper (for Backing)

BONUS MATERIALS:
You don't need them, but these items are things you can add to your creative stock pile for decorative purposes.
-glitter glue
-paint
-Lead pencil and eraser (helpful if you are drawing your own dress for your collage fashion victim.)
-Coloured pencils/gel pens/ sharpies
-Cardstock or patterned paper
-lace/ribbons
-buttons
-sequins, beads feathers....

INSTRUCTIONS:
1. Go through your magazines and cut out anything that you would like to use for your paperdoll

Things like:
-legs
-arms
-dresses (Or other clothing items)
-heads
-shoulders/neck (Depends on the design of the clothes and whether or not the head has a neck attatched.)

Also, If you want to design the doll's dress you could cut out any thing you require for that. Ideas, pages with large sections of pattern(like advertisements), Pictures of things like gemstones or lace trimmings.

Tips:
-You don't have to trim super close to the limbs. a hairline width of background colour shouldn't kill your creation. Cutting too close to the limbs can cause your doll to suddenly lose weight (which will make her look super alien, because models are already quite thin)

-Don't discard limbs too quickly when you are debating whether or not to cut them out. Especially arms, these seem to be hard to come by.

-If you have somewhere to store them and some spare time on your hands, why not cut out some doll parts for later. That way when you want to make another paper doll you don't have to go looking for limbs. You can just take your idea and run with it.


2. Group the "doll parts". Spread them out on a large flat surface and have a bit of a play around. Figure out which ones you think go together.

You don't need the pieces to be proportionally correct, but do be warned a large head on a small body isn't going to give your doll a "realistic" look. Same goes for skin tone. It doesn't have to be a perfect match, but try and get it as close as you can.


3. For those that are creating doll that wears a "Ready to wear" dress (Ahem, dress cut straight out of a magazine) step three involves placing your items down on the page the way you would like to glue them. Checking that you like the arrangement, that nothing needs to be trimmed and deciding on any other decorations. Once happy you can then glue your design into place and decorate. Some decorations may want to wait until after the glue is dry.

FOR THOSE DESIGNING THE OUTFIT:
- Be sure to use your doll parts (especially the shoulders) as a guide for the garments. I did this by tracing around the outline of the trimmed pieces. I also used a picture of a proportionally correct body as a guide for the outfit. Another way to trace involves turning the picture upside down and colouring it in with lead pencil. To transfer the image place the picture right side up on top of the desired paper and trace over the outlines in a sharp pencil or a pen. (You may not want to do this with your doll parts, because it can leave marks, but it is a good way to trace the bust, hips and waist of a model.)
- Go crazy, there's no right way to design a paper doll's dress!


THE END RESULT:
I jazzed it up with some glitter glue and a ribbon. I'm calling it "Marianne at the Masquerade".

OTHER ONES I'VE MADE:
 -The first paper doll I made


 ^ The dress was made with scrapbooking paper and lace

 ^The top and skirt were made with card stock and details were done with pencil. The shawl and trim were made of lace.

^I cut this one out like a proper paperdoll. I made the dress using patterned cut-outs from larger pictures in magazines.

So what did you think?
All this talking about dolls and limbs makes me think about that "Doll Parts" song by Hole.

Your Favourite Blogger,
Natalie