Showing posts with label Crochet. Show all posts

Monday, August 5, 2013

She Wore a Raspberry Beret

Hi guys,
I don't know if any of you guys crochet or not (and if so how many of you there are), but I know that many of you were impressed with my beret and thought that regardless of whether or not you already new how to crochet a beret is definitely a fairly simple task to try. So if you're interested, you can read about how to make your own, and what other crochet projects I have in the works.

I learnt to crochet in grade 6 (the year I turned eleven) and made my little cousin a baby blanket and a baby beanie (though it didn't fit his head - I had underestimated how big a baby's head actually was) and my other cousin used it as a hat for her doll. I have since crocheted more than 60 squares to make a blanket (every time I think I'm finished I realise that I am bigger than I used to be and need a bigger blanket), crocheted some doilies, crocheted some towel toppers and made three berets. I never make anything that is too difficult or with patterns spanning for whole A4 pages. I have a few crochet books, but I have barely tried anything in those.

In the picture above I have shown off two of the berets I have created. There is a black one and a blue/grey. The colours in this photo look a bit odd and it didn't matter what I did with the settings I just couldn't get it to work. I've showed the beret from a top view and a side view. The purple looking ball of wool is actually more maroon looking in real life. I am planning to make a raspberry beret with this colour (yes like a prince song). And, the wool underneath is the wool I used to make a beret for my sister which I don't have a picture of. The wool is actually a mauve/purple mix, not grey like it looks. There are also some polka dot scissors and two different sized crochet hooks.

I used this Free Beret Pattern to guide me, though I didn't entirely restrict myself to it. I found that it was easier to make certain changes to the pattern to avoid certain effects to the overall look of the beret. So each beret has changed slightly in design, my favourite being the last one I made. The first one was more gathered at one side and the second one came to point at the band rather than going straight all the way around. 

I ended up using a hook that was .5mm bigger than suggested as I have a bad habit of doing tight stitches. I also ignored any parts of the pattern that were different at the joining section (for example if it said  "double crochet in nxt 7 dcs *2chain, double crochet in next space* repeat from * around to *" I would do "double crochet in next space 2 chain *repeat till end of round). I also made sure that all of the joins at the end of each round were indeed round (and didn't come to a point) this meant that I would miss stitches or add stitches if needed. I also changed the decreases by half to prevent the puckering effect. And, I included one extra round in there somewhere.

It is also important that you don't freak out when it turns out small an bunchy. An iron on the wool setting will help to stretch it out and make the stitches look neater. Ironing can be the difference between a beret that fits and a doll's hat. Also be sure to learn where your pattern came from and what stitches you should be using. A single crochet is the equivalent of an Aus double crochet and a double crochet is the equivalent of an Aus treble.

Which colour do you think I should make? I have been wanting to make my wine coloured beret (I guess it's not really raspberry but it makes me feel cool to reference a prince song) for a while and had a bit of difficulty understanding the crochet pattern at first. I do really like the black so far though. It's very timeless.

I've got a few towel toppers to finish and that blanket I've been crocheting for ages, but I'm also considering some art deco style hats and a vintage style cape. I have attempted crochet collars before but I'm not to sure about those.

Your Favourite Blogger,
Natalie

Monday, October 15, 2012

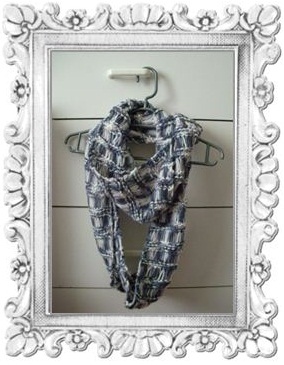
DIY Tube Scarf

I've noticed that there is a lot of winter stuff coming onto the online stores based in the USA. "That's right it's autumn over there at the moment isn't it?" says the forgetful old-lady voice in my head (she also has a brittish accent). Actually, I think the UK and Asia are in for a white Christmas too... Forgive me if I'm wrong, but I'm not entirely sure about how the seasons thing works for different countries.  Anyway, it got me thinking. I was seeing all these lovely chunky scarves and tube scarves and I remembered that I hadn't finished mine. I thought I'd make mine into a tube scarf, because I really couldn't be bothered knitting much longer, And, I thought I'd write a tutorial about it.
 
So if it's autumn in your country this is definitely a good project to have some fun with before it gets too cold. If you are currently residing in a warmer climate (like me) here's a project to pen into your calendar for next autumn. Or, if you are a slow crafter like me, you can start now.
 
STEP 1:
Find a knit or crochet pattern that you like. I used the Loose Knit Scarf Pattern (an old favourite), but you can use any pattern you wish.
 
STEP 2:
Knit or crochet the pattern until the scarf is the length you need. You will need to check the scarf as you go (buy wrapping the scarf around your neck to see if it is long enough to be joined) which can be awkward when the knitting needle is joined onto the end (not much you can do about that sorry). you want to hold both the ends together when you do this (like you would if you were actually sewing them.
 
Things to remember before you decide that the scarf is long enough:
-The scarf not only has to fit around your neck, but it has to be big enough to slide over your head.
-how do you want to wear the scarf? If you want to just pull it over your head it won't have to be very long, but if you want to be able to wrap it around a second time (like mine) you'll need a fair bit more fabric
-You'll have to finish the end of a series of stitches if it is a repetitive pattern and you want the join to be less noticeable
-The scarf will become longer (and wider) once ironed.
 
When folded in half, my scarf (which hadn't her been ironed) measured approximately 33 inches / 82 centimetres in length.
 
STEP 3:
Once you've reached the desired length cast off (or tie a knot) depending on how you are making the scarf.  Then, iron it.
 
STEP 4:
Fold the scarf so that the two ends are sitting at the half way point and sew them together as if they are continuing (diagram below). Sorry about the dodgy drawing (made it on paint). I would have taken pictures of the real thing, but due to the mottled yarn and the lighting in the house I just don't think it would have made much sense.


 STEP 5:
You can tuck the ends in using a crochet hook, but if you're like me and aren't very good at that sort of thing, try tying a very tight knot and snipping the thread of very close to it. I then used clear nail polish to protect the knot from coming undone or the end from fraying.
 
STEP 6:
Wear it!
 
These scarves are very easy to wear. Like a loose necklace you can throw it over your head and twist it around once more. They can also save you the cost of extra yarn, because you don't need so much to make it.
 
ANOTHER IDEA:
 
Which I saw here. I prefer mine without fringing, but it's up to the individual.
 
If you can't knit or crochet, but have an old shirt that you don't wear anymore, you can cut the bottom off the old shirt and wear it as a scarf. You won't even have to sew (unless the shirt isn't made out of jersey-type fabric, which means you'll have to hem it bottom and top). Unfortunately you won't get a choice in length with this one.
 
Hope you enjoyed the tute!
 
Your Favourite Blogger,
Natalie

Sunday, February 27, 2011

Cool crochet.


Crochet is not just for your nanna!


In the old days crochet was limited to toweltops, teacozies, doilies and table cloths. After sometime in the 1970's a few hideous vests were made and in the 90's there were a few joker's hats. Now let me brace you for modern day crochet. There are a few psychadelic designs inspired by the better looking olden day patterns and a whole lot of new design which involves berets, cute mesh tops and even jewellery.

When first learning to crochet i read I Love Crochet by Rachel Henderson and Sarah Hazell. While i haven't actually made any of the patterns included in the book - but, are determined too- I have found the book to be very helpful with understanding stitches and their abbreviations. I did find some free patterns on the net which i usually find by searching for "free crochet patterns" in google images and clicking on the pictures that please my eye the most. You can also find Youtube tutorials on how to do different trims and patterns.

Crochet patterns can be bought individually (like sewing patterns) or bought in book form amongst other patterns. Have a look through your library or bookstore for some books on modern crochet or online at Google booksAmazon (american/global site) or Fishpond (australian book site). And, while i have advised against most old patterns if you can get your hands on an ancient copy of "Vogue Crochet" you will be blessed with some truly cool psychadelic patterns.

handy hints:
AMERICA and AUSTRALIA / ENGLAND have different stitch names.
an american sc or Single crochet is the same as an australian dc or double crochet
                                 and
an american dc or Double crochet is the same as an australian Treble

So make sure that you know where your pattern originated from. an easy way to know this is that single crochet stitch does not "exist" in Australia and treble does not "exist " in america. also check the publication page or author page or check the website contact info (if from a website).
have fun crocheting!

P.s. to find the origins of the above pictures and get the patterns click on the image. I don't think the middle one has a pattern.