I don't know if any of you guys crochet or not (and if so how many of you there are), but I know that many of you were impressed with my beret and thought that regardless of whether or not you already new how to crochet a beret is definitely a fairly simple task to try. So if you're interested, you can read about how to make your own, and what other crochet projects I have in the works.
I learnt to crochet in grade 6 (the year I turned eleven) and made my little cousin a baby blanket and a baby beanie (though it didn't fit his head - I had underestimated how big a baby's head actually was) and my other cousin used it as a hat for her doll. I have since crocheted more than 60 squares to make a blanket (every time I think I'm finished I realise that I am bigger than I used to be and need a bigger blanket), crocheted some doilies, crocheted some towel toppers and made three berets. I never make anything that is too difficult or with patterns spanning for whole A4 pages. I have a few crochet books, but I have barely tried anything in those.
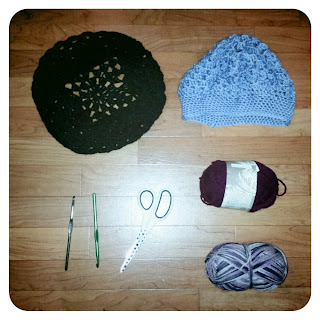
In the picture above I have shown off two of the berets I have created. There is a black one and a blue/grey. The colours in this photo look a bit odd and it didn't matter what I did with the settings I just couldn't get it to work. I've showed the beret from a top view and a side view. The purple looking ball of wool is actually more maroon looking in real life. I am planning to make a raspberry beret with this colour (yes like a prince song). And, the wool underneath is the wool I used to make a beret for my sister which I don't have a picture of. The wool is actually a mauve/purple mix, not grey like it looks. There are also some polka dot scissors and two different sized crochet hooks.
I used this Free Beret Pattern to guide me, though I didn't entirely restrict myself to it. I found that it was easier to make certain changes to the pattern to avoid certain effects to the overall look of the beret. So each beret has changed slightly in design, my favourite being the last one I made. The first one was more gathered at one side and the second one came to point at the band rather than going straight all the way around.
I ended up using a hook that was .5mm bigger than suggested as I have a bad habit of doing tight stitches. I also ignored any parts of the pattern that were different at the joining section (for example if it said "double crochet in nxt 7 dcs *2chain, double crochet in next space* repeat from * around to *" I would do "double crochet in next space 2 chain *repeat till end of round). I also made sure that all of the joins at the end of each round were indeed round (and didn't come to a point) this meant that I would miss stitches or add stitches if needed. I also changed the decreases by half to prevent the puckering effect. And, I included one extra round in there somewhere.
It is also important that you don't freak out when it turns out small an bunchy. An iron on the wool setting will help to stretch it out and make the stitches look neater. Ironing can be the difference between a beret that fits and a doll's hat. Also be sure to learn where your pattern came from and what stitches you should be using. A single crochet is the equivalent of an Aus double crochet and a double crochet is the equivalent of an Aus treble.
Which colour do you think I should make? I have been wanting to make my wine coloured beret (I guess it's not really raspberry but it makes me feel cool to reference a prince song) for a while and had a bit of difficulty understanding the crochet pattern at first. I do really like the black so far though. It's very timeless.
I've got a few towel toppers to finish and that blanket I've been crocheting for ages, but I'm also considering some art deco style hats and a vintage style cape. I have attempted crochet collars before but I'm not to sure about those.
Your Favourite Blogger,
Natalie

No comments:
Post a Comment