Showing posts with label tutorial. Show all posts

Monday, October 15, 2012

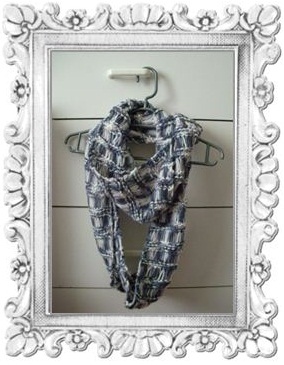
DIY Tube Scarf

I've noticed that there is a lot of winter stuff coming onto the online stores based in the USA. "That's right it's autumn over there at the moment isn't it?" says the forgetful old-lady voice in my head (she also has a brittish accent). Actually, I think the UK and Asia are in for a white Christmas too... Forgive me if I'm wrong, but I'm not entirely sure about how the seasons thing works for different countries.  Anyway, it got me thinking. I was seeing all these lovely chunky scarves and tube scarves and I remembered that I hadn't finished mine. I thought I'd make mine into a tube scarf, because I really couldn't be bothered knitting much longer, And, I thought I'd write a tutorial about it.
 
So if it's autumn in your country this is definitely a good project to have some fun with before it gets too cold. If you are currently residing in a warmer climate (like me) here's a project to pen into your calendar for next autumn. Or, if you are a slow crafter like me, you can start now.
 
STEP 1:
Find a knit or crochet pattern that you like. I used the Loose Knit Scarf Pattern (an old favourite), but you can use any pattern you wish.
 
STEP 2:
Knit or crochet the pattern until the scarf is the length you need. You will need to check the scarf as you go (buy wrapping the scarf around your neck to see if it is long enough to be joined) which can be awkward when the knitting needle is joined onto the end (not much you can do about that sorry). you want to hold both the ends together when you do this (like you would if you were actually sewing them.
 
Things to remember before you decide that the scarf is long enough:
-The scarf not only has to fit around your neck, but it has to be big enough to slide over your head.
-how do you want to wear the scarf? If you want to just pull it over your head it won't have to be very long, but if you want to be able to wrap it around a second time (like mine) you'll need a fair bit more fabric
-You'll have to finish the end of a series of stitches if it is a repetitive pattern and you want the join to be less noticeable
-The scarf will become longer (and wider) once ironed.
 
When folded in half, my scarf (which hadn't her been ironed) measured approximately 33 inches / 82 centimetres in length.
 
STEP 3:
Once you've reached the desired length cast off (or tie a knot) depending on how you are making the scarf.  Then, iron it.
 
STEP 4:
Fold the scarf so that the two ends are sitting at the half way point and sew them together as if they are continuing (diagram below). Sorry about the dodgy drawing (made it on paint). I would have taken pictures of the real thing, but due to the mottled yarn and the lighting in the house I just don't think it would have made much sense.


 STEP 5:
You can tuck the ends in using a crochet hook, but if you're like me and aren't very good at that sort of thing, try tying a very tight knot and snipping the thread of very close to it. I then used clear nail polish to protect the knot from coming undone or the end from fraying.
 
STEP 6:
Wear it!
 
These scarves are very easy to wear. Like a loose necklace you can throw it over your head and twist it around once more. They can also save you the cost of extra yarn, because you don't need so much to make it.
 
ANOTHER IDEA:
 
Which I saw here. I prefer mine without fringing, but it's up to the individual.
 
If you can't knit or crochet, but have an old shirt that you don't wear anymore, you can cut the bottom off the old shirt and wear it as a scarf. You won't even have to sew (unless the shirt isn't made out of jersey-type fabric, which means you'll have to hem it bottom and top). Unfortunately you won't get a choice in length with this one.
 
Hope you enjoyed the tute!
 
Your Favourite Blogger,
Natalie

Friday, August 10, 2012

DIY Tutorial: Loose fitting shirt


I did a post not too long ago called 'Comfort Meets Class' where I talked  about my version of comfy and how you don't have to "dress down" to be comfortable. One of the DIY ideas I included was to create a loose fitting shirt. So today that's what I decided to do. I'm not great at sewing, but I'm hoping I've managed to get my idea across.

THE MATERIAL:
The "Material" I decided to use to make this shirt was a second hand men's shirt. I bought three shirts at the op-shop the other day all intended for DIY projects. Two of these shirts cost me $6 and one of them cost me $4. I'm hoping to get at least one garment out of each shirt. We don't have a good material shop in our town and even if we did I'd probably still prefer to buy second hand because it's much cheaper.

 What I like about them is that they are made out of a nice thin, soft material and have cool patterns on them. I decided to go with men's shirts rather than women's because the fabric  tended to be softer and the shirts were larger which gave me more room to work with. Women's shirts also tended to cost more than the men's shirts and have darts sewn into them (which didn't work well for the style shirt I want to make). I liked that the shirts were button-up shirts, but this style can be done without buttons too.


^ These are the three shirts I bought on my op-shop trip. I chose to use the one on the left for this project. I was a little disappointed that I couldn't find any plain/plainer looking shirts to cut up for this project, because I thought that would suit the style of shirt I want to make.

THE IDEA:
I got the Idea to make a loose-fitting shirt simply because I have a few of them and I wear them a lot. This is legitimate. The shirt goes into the wash and as soon as it's clean again I'm wearing it. I thought they looked easy enough to make and that seeing as they were a loose fitting style, it wouldn't matter if I made it slightly bigger or smaller than the original.

According to one of the price tags from a shirt I have of this style, these shirts are called 'Boyfriend' shirts. I guess this makes sense because like boyfriend jeans the shirt is a bit baggy and isn't really designed to show off your curves. I have four different variations of the 'Boyfriend shirt' and decided to copy the one that I like best.


^ This is the shirt I decided to copy. It's made of three pieces and it's only fault is that it's a tincy bit short (probably something to do with how tall I am). I got this shirt from my sister who got it free with a magazine. It's one of those one-size-fits-all clothing items, but my sister didn't want it so I adopted it.

WHAT YOU NEED:
-Material of some sort (Preferably with a big enough surface area to cut out one whole piece of your pattern)
-A boyfriend shirt to use as a pattern (you could also use an over sized t shirt or a cropped top)
-Sewing supplies (pins, sewing machine, quick unpick, dressmaking scissors...)

INSTRUCTIONS:
1. Remove things that you can use later or that won't suit your chosen shirt style. For example if you like detachable collars and want to make your own (and if your shirt has stitching up near the collar) you can cut the collar off and save it. I decided to get rid of the pocket because it would have been in an awkward spot when the garment was finished.
^I didn't have a quick unpick so I used a 1.25mm crochet hook (yep I crochet) and a pair of teeny tiny embroidery scissors (you can use nail scissors if you like) to unpick the stitches.

2. Lay the shirt down flat and place your garment on top of it and start cutting out your pattern pieces.
^ I chose to put my shirt upside-down because ladies buttons do-up on the other side to men's ones and because the holes from unpicking the pocket would be less noticeable down the bottom of the shirt.

^I folded bits of the boyfriend shirt underneath so that I would only cut the material to get the pattern piece I needed. I was careful to only cut the top layer of fabric (the shirt was buttoned up) and to leave an inch or so around the grey shirt for seams. I cut the pattern piece a bit longer than the grey shirt on purpose.

^ This is the back piece of the pattern.

^ This is when I was cutting out the thick shoulder bias strips.

3. Lay out the pattern pieces in order and start pinning them together for sewing.
^ The piece on the left is the back, the two pieces in the middle are the bias strips and the piece on the right is the front. In this picture the two bias pieces are actually the wrong way around. Luckily I figured that out before I started pinning and sewing.

^ This is my shirt all pinned up and ready to go. Remember to pin your garment inside-out.

4. Check that you've done it right before you go and stitch it up permanently.
^ For example check that the arm holes are big enough. Remember if you're using a shirt made out of a stretch fabric as your pattern you will have to make allowances for the lack of resilience in other fabrics when cutting and pinning your pattern.

4. Sew. If you've had experience with sewing you'll probably be able to guess what to do next.
I used a straight stitch to stitch the side seams and shoulder seams. After checking that they were correct I used a fine zigzag stitch to stop fraying (don't have an over-locker).
I then doubled over the ends of the sleeves, the neckline and the bottom of the shirt before pinning and sewing (If you have an overlocker you could just overlock and fold under once.

I had issues with the sewing machine toward the end, because the machine doesn't work well with certain types of cotton, I don't have an over-locker, I don't have heaps of sewing experience and I didn't have the needle set up right. So the shirt does look a little bit dodgier than I had hoped. Considering how much went wrong with the shirt towards the end I think it turned out okay.

^ The finished product. I think It will look nice with denim and faux pearls.

Your Favourite Blogger,
Natalie

Friday, July 27, 2012

DIY Cover Picture for Facebook Timeline

Those who follow the blog's Facebook page may have noticed a knew timeline picture (pictured above). I came up with the idea to create one using Polyvore after seeing many collage cover pictures generated by apps on personal facebook pages. I thought: "I wonder if Goodreads has an app like this?" If they did have one I still haven't found it. And then, I remembered that I used to make little pictures for my blog (still do) for segments and such, and why didn't I just make a cover picture using polyvore. Even better, why didn't I make a template so other people could use it and I could make a new one when I got sick of the one I just made?

HOW IT WORKS:
It's actually pretty simple. I created a template on Polyvore.com (via Create>Template) which I published with instructions on how I recommend the template to be used. I then filled out the template (via Create>Set) and found the template (via Templates>My Templates), filled it out, published it and used the 'Snipper Tool' (Which most modern computers have). I highlighted the area I wanted to save as an Image, saved it and then went on to facebook and uploaded a new cover image.

If you are using a template created by someone else you will need to visit a set of that template (a filled out template someone has published) and click on the miniature image of the template below the set. You will be taken to a screen with an empty image of the template and will need to click on the option to "Fill this template". I have created a collection of sets (Click Here) that I have made using different timeline templates. To access the template click on the set (the template filled out) that you most desire and follow the instructions at the beginning of this paragraph.

FILLING OUT YOUR TEMPLATE:
-The template can be filled out using images from 'My Items' or from the polyvore search engine. Select the image you want and drag it over to the placeholder you would like to put it into. Once the placeholder is highlighted orange drop the image.

-To find the item you want be sure to use the right keywords. For example if you are looking for a galaxy background image be sure to search "galaxy background", because "galaxy" will land you with a heap of really pretty star splattered skirts.

-To add items to 'My Items' so that you have them for later you can click on the image you want (In the right sidebar only; don't click on images in the template) and a few options will come up. One of them should be 'Save to my Items'. If you want to add images to Polyvore that aren't there already you can install the Polyvore Clipper which allows you to download images from your favourite Tumblrs and blogs.

-If you are having any issues with your image not looking right in the template you can:
  • Move it around within the placeholder, by clicking on the image (not letting go of the button on the mouse) and move the mouse until your image is in the desired spot.
  • Make the image smaller or larger using the slider thing (that looks kinda like a volume adjustment thingy) at the top of the page.
  • Flop or flip the image using the buttons up the top of the page
  • Take away the background of the image or add the background of the image. There are two squares next to the slider thing.
  • "Fit" the image. Which really just means that the biggest part of the image (length or width) does not exceed the placeholder.
  • Remove the image and add a new one.
THINGS TO REMEMBER WHEN MAKING A TEMPLATE:
I'm not going to explain how to make a template. If you are a polyvore wiz you'll know all about it. If not it's probably easier for you to use someone else's template. If you're still interested check out Polyvore Help center: How to create a template . It's not the best explanations, but like somethings, making templates is a bit of learn as you go/ trial and error.

-When making a template you really want to get the size right. You want a cover picture that isn't cut off by facebook, because it isn't the right size. To get this right I like to search for 'Timeline' in the search engine and use one of the facebook timeline images that comes up as a stencil for the background colour or place holder (and then I delete the initial image I used). Be sure that the image you found in the search engine is the right size. some of them can be a little bit "tall".

-Remember that your profile picture will cover up part of the bottom left hand corner.

-Remember that the images will get zoomed in when the cover picture is uploaded to facebook, so don't be afraid to make them a little bit smaller.

-You can't type text to use when filling out the template. You can only type text when you are creating it. If you want to be able to choose song lyrics or quotes you  might be lucky to find image versions through the search engine. If not, you could create image versions to upload onto Tumblr and upload them onto Polyvore using the Polyvore Clipper.

STILL CONFUSED?
Polyvore is a site used to create fashion/art/interior design layouts called 'Sets'. 'Templates' can be made so that people can fill them out to make 'Sets' instead of starting from scratch. I designed some special 'Templates' for facebook timeline. I made a cover picture by filling out the template, publishing it, using the snipper tool (you should have one in your computer) to save the set onto  my computer and uploaded it to facebook.

Here's one I made for my personal facebook page:
The Picture on the bottom left corner (The hand holding the stick, pointing at the moon) was mostly covered up by the profile picture. You can see a bigger version of this timeline on polyvore (via the link to the collection higher up in this post)

If you have found or made any new Timeline Templates (Templates, not sets) could you please leave a link in the comments so I can add it to my collection?

I've noticed a few Polyvorians that normally don't "Like" sets of trivial stuff have been liking these timeline sets I've been publishing, And, people have been liking the ones I've published to facebook. Which seems unusual. So, I'm guessing it's a decent sort of idea? We'll see...

Your Favourite Blogger,
Natalie

Monday, May 21, 2012

DIY PAPER DOLLIES!

YAY! My first attempt at a crafting tutorial!
What we have here is my version of a hand made paper doll. It's not the sort of paper doll you can change clothes on -however, you might be able to make one that does that if you are crafty enough- these are more permanent impressions of paper dolls inspired by Polyvore's interpretation of paper dolls and a book called 'Artful Paper Dolls' by Terry Taylor.

The Paper dolls on Polyvore consist of digitally cropped pictures of models, celebrities and garments that form the shape of a model. It's another way to present a concept or express yourself on polyvore and has become quite a popular method of doing so. The link (Polyvore underlined above) will send you to my Polyvore collection of paper dolls that I've made using the polyvore method.

The ones featured in Terry Taylor's book vary largely. I prefer the ones fashioned from old magazines, newspapers and brochures. In a way I'm combining the two versions to make my own sort of paper dolls. They are more modern and up market than Terry Taylor's, but more crafty than Polyvore's. I hope you enjoy my tutorial!

What you'll Need:
THE NECCESSITIES:
-Scissors
-Glue
-Magazines (Old ones. Please don't go murdering your latest Vogue or Frankie mags on my account)
-Paper (for Backing)

BONUS MATERIALS:
You don't need them, but these items are things you can add to your creative stock pile for decorative purposes.
-glitter glue
-paint
-Lead pencil and eraser (helpful if you are drawing your own dress for your collage fashion victim.)
-Coloured pencils/gel pens/ sharpies
-Cardstock or patterned paper
-lace/ribbons
-buttons
-sequins, beads feathers....

INSTRUCTIONS:
1. Go through your magazines and cut out anything that you would like to use for your paperdoll

Things like:
-legs
-arms
-dresses (Or other clothing items)
-heads
-shoulders/neck (Depends on the design of the clothes and whether or not the head has a neck attatched.)

Also, If you want to design the doll's dress you could cut out any thing you require for that. Ideas, pages with large sections of pattern(like advertisements), Pictures of things like gemstones or lace trimmings.

Tips:
-You don't have to trim super close to the limbs. a hairline width of background colour shouldn't kill your creation. Cutting too close to the limbs can cause your doll to suddenly lose weight (which will make her look super alien, because models are already quite thin)

-Don't discard limbs too quickly when you are debating whether or not to cut them out. Especially arms, these seem to be hard to come by.

-If you have somewhere to store them and some spare time on your hands, why not cut out some doll parts for later. That way when you want to make another paper doll you don't have to go looking for limbs. You can just take your idea and run with it.


2. Group the "doll parts". Spread them out on a large flat surface and have a bit of a play around. Figure out which ones you think go together.

You don't need the pieces to be proportionally correct, but do be warned a large head on a small body isn't going to give your doll a "realistic" look. Same goes for skin tone. It doesn't have to be a perfect match, but try and get it as close as you can.


3. For those that are creating doll that wears a "Ready to wear" dress (Ahem, dress cut straight out of a magazine) step three involves placing your items down on the page the way you would like to glue them. Checking that you like the arrangement, that nothing needs to be trimmed and deciding on any other decorations. Once happy you can then glue your design into place and decorate. Some decorations may want to wait until after the glue is dry.

FOR THOSE DESIGNING THE OUTFIT:
- Be sure to use your doll parts (especially the shoulders) as a guide for the garments. I did this by tracing around the outline of the trimmed pieces. I also used a picture of a proportionally correct body as a guide for the outfit. Another way to trace involves turning the picture upside down and colouring it in with lead pencil. To transfer the image place the picture right side up on top of the desired paper and trace over the outlines in a sharp pencil or a pen. (You may not want to do this with your doll parts, because it can leave marks, but it is a good way to trace the bust, hips and waist of a model.)
- Go crazy, there's no right way to design a paper doll's dress!


THE END RESULT:
I jazzed it up with some glitter glue and a ribbon. I'm calling it "Marianne at the Masquerade".

OTHER ONES I'VE MADE:
 -The first paper doll I made


 ^ The dress was made with scrapbooking paper and lace

 ^The top and skirt were made with card stock and details were done with pencil. The shawl and trim were made of lace.

^I cut this one out like a proper paperdoll. I made the dress using patterned cut-outs from larger pictures in magazines.

So what did you think?
All this talking about dolls and limbs makes me think about that "Doll Parts" song by Hole.

Your Favourite Blogger,
Natalie